
As you may know, Fasterize is an active partner of webpagetest and host the agents for Paris.
The purpose of this guide is giving the maximum pieces of information to install an agent. Most steps are illustrated with pictures.
Automatically log-on to an administrator account.
Run “control userpasswords2” from the start menu.
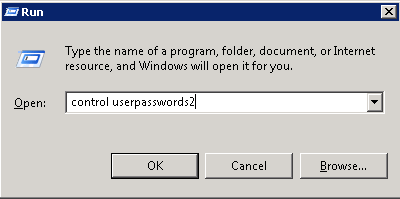
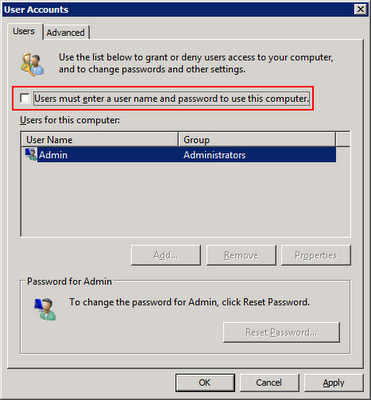
Then uncheck the box for « Users must enter a user name and password to use this computer ».
Disable any screen savers
The desktop needs to remain visible for the video capture to work.
Run the command regedt32.
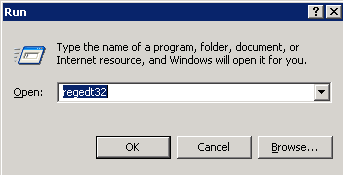
then go to HKEY_CURRENT_USER > Control Panel > Desktop and set the key ScreenSaveActive to 0.

Disable UAC
- Click on Start, and then click on Control Panel.
- In Control Panel, click on User Accounts.
- In the User Accounts window, click on Change User Account Control settings.
- Then, move the cursor to “never notify”.

Uninstall IE Enhanced-Security Mode
- Start “Server Manager”
- Under the “security information section, click on the Configure IE ESC” link

Change it to Off.

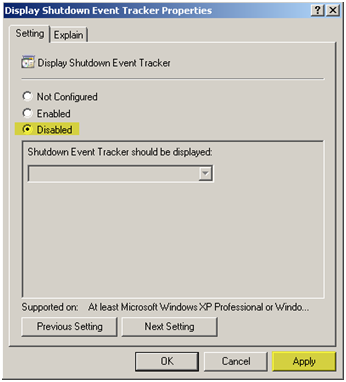
Disable Shutdown Event Tracker
Run the command gpedit.msc

Open “Computer Configuration/Administrative Templates/System”
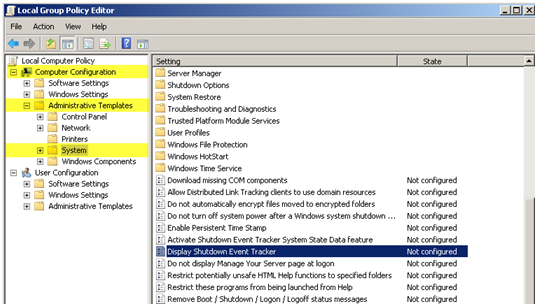
Open “Display Shutdown Event Tracker”
Set it to disabled
Download the webpagetest agent and install the dependencies
Download the latest webpagetest software on github :
https://github.com/WPO-Foundation/webpagetest/releases
Unzip the folder “agent” in the folder in “C:\webpagetest »
Install the dependencies for the videos creation
Install AVISynth from the C:\webpagetest.
It’s necessary for creating videos.
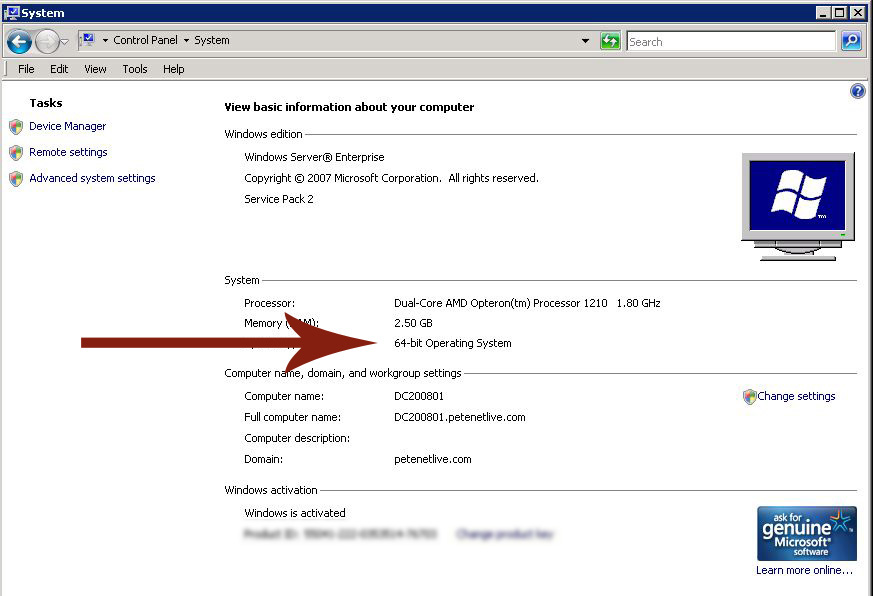
Find if the windows is a 32-bit or 64-bit edition.
You can find the information in Control Panel > System
Installation of the DUMMYNET ipfw driver
It’s necessary to control the speed of the network.
If you are installing on 64-bit Windows, right-click on “testmode.cmd” in the C:\webpagetest\dummynet\64bit folder and select “Run as Administrator”.
Reboot the system to enable testmode.
If you do not run this then traffic shaping will not work after a reboot.
Copy the files from either the webpagetest\dummynet\32bit or webpagetest\dummynet\64bit directory into the webpagetest\dummynet directory.
Pull up the properties for the Network Adapter that is used to access the Internet :
Go to the control panel
Go to the network and sharing system
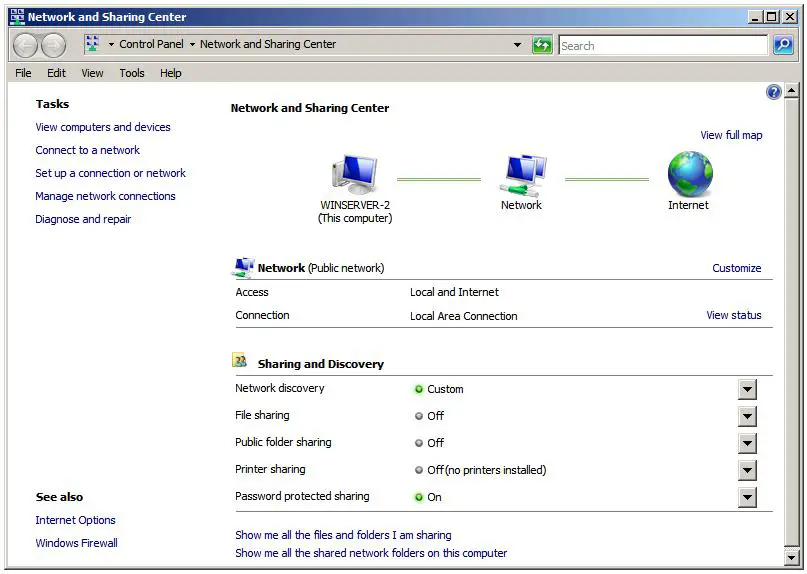
Click on “Manage network connections”
Click on “properties” of the Network Adapter that is used to access the Internet.

Select “Internet Protocol Version 4”
Click on “Install”
Select “Service” and click “Add”
Click on “Have Disk” and navigate to webpagetest/dummynet
Select the ipfw+dummynet service (and click through any warnings about the driver being unsigned)
Install and configure the agent
Create the wptdriver.ini file
You can find an example below and change the line in bold.
Note : Verify that the folder Program Files is called Program Files (x86) or Program Files.
You can find a template here : https://gist.github.com/abarre/11297662
Make sure that wptdriver is launched at the startup
Create a shortcut to C:\webpagetest\wptdriver.exe in the startup folder.
The startup folder can be found in Start > Programs > Startup
Install Chrome and Firefox
Launch C\:webpagetest\wptdriver
wptdriver can automatically install Chrome and Firefox (and keep Firefox up to date).
If you get an error, it’s likely because path in wptdriver.ini are incorrect.
Configure IE
You need to launch IE and activate the extension in the popup.
Install urlblast
Urlblast is the legacy driver for IE and is also responsible of rendering the video. As you may expect, the videos are not created by the server but are created by urlblast.
- Create a shortcut to C:\webpagetest\urlblast.exe in the startup folder
- Make a copy of the settings file (urlblast.ini) based on the sample
- Give it the path to the server (default configuration points to a server on the local machine)
- Configure the location to match the location defined on the server in locations.ini (if modified)
- Configure the location key to match the server in locations.ini (if modified)
Reboot the system to make sure everything starts up correctly
Add the agent to the server
You need to update the location.ini file in the server.
Be sure to use the same name as the name defined in the wptdriver.ini file.